
Open vSwitch 系列之一 Open vSwitch 诞生 (opens new window) Open vSwitch 系列之二 安装指定版本 ovs (opens new window) Open vSwitch 系列之三 ovs-vsctl 命令使用 (opens new window) Open vSwitch 系列之四 ovs-ofctl 命令使用 (opens new window) Open vSwitch 系列之五 网桥特性功能配置 (opens new window) Open vSwitch 系列之六 vlan 隔离 (opens new window) Open vSwitch 系列之七 meter 表限速 (opens new window) Open vSwitch 系列之八 vxlan 隧道 (opens new window) Open vSwitch 系列之九 Group 表 (opens new window) Open vSwitch 系列之十 调用北向接口下发流表 (opens new window) OpenvSwitch 系列之十一 ovs-dpdk (opens new window)
官方介绍:
VXLAN(Virtual eXtensible Local Area Network,虚拟扩展局域网),是由 IETF 定义的 NVO3(Network Virtualization over Layer 3)标准技术之一,是对传统 VLAN 协议的一种扩展。VXLAN 的特点是将 L2 的以太帧封装到 UDP 报文(即 L2 over L4)中,并在 L3 网络中传输。VXLAN 本质上是一种隧道技术,在源网络设备与目的网络设备之间的 IP 网络上,建立一条逻辑隧道,将用户侧报文经过特定的封装后通过这条隧道转发。
vxlan 是一种网络协议,将原始数据封装到 UDP 数据包中传输。vxlan 被广泛应用到云计算网络环境中,耳熟能详的云计算框架openstack主要的网络架构就是 vxlan,kubernetes也有 vxlan 的网络插件。vxlan 有许多优点,诸如:
- 连接两个局域网,可以将局域网内主机之间流量互通。就像是在局域网之间架起桥梁
- 支持隔离。vlan 最多支持 4096 个隔离,而 vxlan 支持 2 的次方数 32 即 4294967296 据隔离
vxlan 的封装格式

本篇文章使用 ovs 搭建 vxlan 网桥,连接两个 mininet 构建的局域网。 实验环境:两台虚拟机 ubuntu1804 桌面版 + ubuntu1604 桌面版 + mininet
*1*|*0* 安装 mininet
分别在两台机器上安装 mininet
*1*|*1* 安装 git 工具
root@ubuntu:~# apt install git
Reading package lists... Done
Building dependency tree
Reading state information... Done
The following additional packages will be installed:
  git-man liberror-perl
Suggested packages:
  git-daemon-run | git-daemon-sysvinit git-doc git-el git-email git-gui gitk gitweb git-arch git-cvs git-mediawiki git-svn
The following NEW packages will be installed:
  git git-man liberror-perl
0 upgraded, 3 newly installed, 0 to remove and 406 not upgraded.
Need to get 3,932 kB of archives.
After this operation, 25.6 MB of additional disk space will be used.
Do you want to continue? [Y/n] y
2
3
4
5
6
7
8
9
10
11
12
13
14
*1*|*2* 从 github 上拉取 mininet 源码
root@openlab:~# git clone git://github.com/mininet/mininet
Cloning into 'mininet'...
remote: Enumerating objects: 9752, done.
remote: Total 9752 (delta 0), reused 0 (delta 0), pack-reused 9752
Receiving objects: 100% (9752/9752), 3.03 MiB | 1.35 MiB/s, done.
Resolving deltas: 100% (6472/6472), done.
2
3
4
5
6
*1*|*3* 安装 mininet
mininet 的安装是进入mininet/util目录中,然后执行 ./install -a。-a表示安装全部的组件。mininet 的安装可以有很多备选项。
root@openlab:~/mininet/util# ./install.sh -a
Detected Linux distribution: Ubuntu 18.04 bionic amd64
sys.version_info(major=3, minor=6, micro=7, releaselevel='final', serial=0)
Detected Python (python3) version 3
Installing all packages except for -eix (doxypy, ivs, nox-classic)...
Install Mininet-compatible kernel if necessary
.......
.......
.......
libtool: install: /usr/bin/install -c cbench /usr/local/bin/cbench
make[2]: Nothing to be done for 'install-data-am'.
make[2]: Leaving directory '/root/oflops/cbench'
make[1]: Leaving directory '/root/oflops/cbench'
Making install in doc
make[1]: Entering directory '/root/oflops/doc'
make[1]: Nothing to be done for 'install'.
make[1]: Leaving directory '/root/oflops/doc'
Enjoy Mininet!
2
3
4
5
6
7
8
9
10
11
12
13
14
15
16
17
18
*1*|*4* 验证安装
安装完成之后,ovs会安装好,使用ovs-vsctl show命令,查看 ovs 版本
root@openlab:~/mininet/util# ovs-vsctl show
58cc7b02-ef48-4de7-a96b-ee1c0259472d
    ovs_version: "2.9.5"
2
3
使用命令 mn 创建一个最小拓扑的环境。包括一个控制器,一个交换机,两个主机。

root@openlab:~/mininet/util# mn
*** Creating network
*** Adding controller
*** Adding hosts:
h1 h2
*** Adding switches:
s1
*** Adding links:
(h1, s1) (h2, s1)
*** Configuring hosts
h1 h2
*** Starting controller
c0
*** Starting 1 switches
s1 ...
*** Starting CLI:
mininet>
2
3
4
5
6
7
8
9
10
11
12
13
14
15
16
17
*2*|*0* 配置 vxlan
*2*|*1* 第一台机器配置
记录下第一台机器的 ip 地址和路由信息,后面会使用这些信息。
root@openlab:~/mininet/util# ifconfig
ens33: flags=4163<UP,BROADCAST,RUNNING,MULTICAST>  mtu 1500
        inet 192.168.175.130  netmask 255.255.255.0  broadcast 192.168.175.255
        inet6 fe80::20c:29ff:fe45:a8b7  prefixlen 64  scopeid 0x20<link>
        ether 00:0c:29:45:a8:b7  txqueuelen 1000  (Ethernet)
        RX packets 247144  bytes 344597431 (344.5 MB)
        RX errors 0  dropped 0  overruns 0  frame 0
        TX packets 74937  bytes 6024181 (6.0 MB)
        TX errors 0  dropped 0 overruns 0  carrier 0  collisions 0

lo: flags=73<UP,LOOPBACK,RUNNING>  mtu 65536
        inet 127.0.0.1  netmask 255.0.0.0
        inet6 ::1  prefixlen 128  scopeid 0x10<host>
        loop  txqueuelen 1000  (Local Loopback)
        RX packets 993  bytes 76788 (76.7 KB)
        RX errors 0  dropped 0  overruns 0  frame 0
        TX packets 993  bytes 76788 (76.7 KB)
        TX errors 0  dropped 0 overruns 0  carrier 0  collisions 0
2
3
4
5
6
7
8
9
10
11
12
13
14
15
16
17
18
root@openlab:~/mininet/util# route -n
Kernel IP routing table
Destination     Gateway         Genmask         Flags Metric Ref    Use Iface
0.0.0.0         192.168.175.2   0.0.0.0         UG    100    0        0 ens33
192.168.175.0   0.0.0.0         255.255.255.0   U     0      0        0 ens33
192.168.175.2   0.0.0.0         255.255.255.255 UH    100    0        0 ens33
2
3
4
5
6
*2*|*2* 第二台机器配置
同样,记录第二台机器的 ip 地址和路由信息。
ens33     Link encap:Ethernet  HWaddr 00:0c:29:a6:71:34
          inet addr:192.168.175.128  Bcast:192.168.175.255  Mask:255.255.255.0
          inet6 addr: fe80::b933:b350:fe27:b89a/64 Scope:Link
          UP BROADCAST RUNNING MULTICAST  MTU:1500  Metric:1
          RX packets:56351 errors:0 dropped:0 overruns:0 frame:0
          TX packets:14943 errors:0 dropped:0 overruns:0 carrier:0
          collisions:0 txqueuelen:1000
          RX bytes:76128903 (76.1 MB)  TX bytes:1464272 (1.4 MB)

lo        Link encap:Local Loopback
          inet addr:127.0.0.1  Mask:255.0.0.0
          inet6 addr: ::1/128 Scope:Host
          UP LOOPBACK RUNNING  MTU:65536  Metric:1
          RX packets:404 errors:0 dropped:0 overruns:0 frame:0
          TX packets:404 errors:0 dropped:0 overruns:0 carrier:0
          collisions:0 txqueuelen:1000
          RX bytes:33728 (33.7 KB)  TX bytes:33728 (33.7 KB)
2
3
4
5
6
7
8
9
10
11
12
13
14
15
16
17
root@ubuntu:~/mininet/util# route -n
Kernel IP routing table
Destination     Gateway         Genmask         Flags Metric Ref    Use Iface
0.0.0.0         192.168.175.2   0.0.0.0         UG    100    0        0 ens33
169.254.0.0     0.0.0.0         255.255.0.0     U     1000   0        0 ens33
192.168.175.0   0.0.0.0         255.255.255.0   U     100    0        0 ens33
2
3
4
5
6
*2*|*3* 创建隧道网桥 br-tun
使用 ovs 创建一个网桥,叫做 br-tun,该网桥后面会作为 vxlan 隧道的端点。两个虚拟机都需要创建。
root@openlab:~/mininet/util# ovs-vsctl add-br br-tun
root@openlab:~/mininet/util#
root@openlab:~/mininet/util# ovs-vsctl show
58cc7b02-ef48-4de7-a96b-ee1c0259472d
    Bridge br-tun
        Port br-tun
            Interface br-tun
                type: internal
    ovs_version: "2.9.5"
2
3
4
5
6
7
8
9
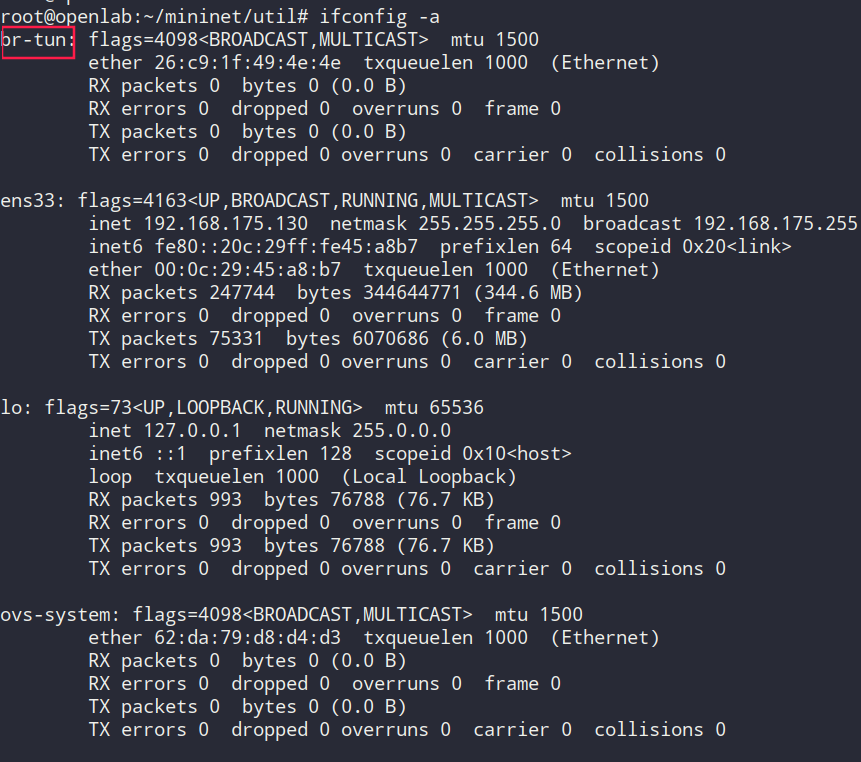
创建好 br-tun 之后,可以用ifconfig -a查看到这个设备
root@openlab:~/mininet/util# ifconfig -a
br-tun: flags=4098<BROADCAST,MULTICAST>  mtu 1500
        ether 26:c9:1f:49:4e:4e  txqueuelen 1000  (Ethernet)
        RX packets 0  bytes 0 (0.0 B)
        RX errors 0  dropped 0  overruns 0  frame 0
        TX packets 0  bytes 0 (0.0 B)
        TX errors 0  dropped 0 overruns 0  carrier 0  collisions 0

ens33: flags=4163<UP,BROADCAST,RUNNING,MULTICAST>  mtu 1500
        inet 192.168.175.130  netmask 255.255.255.0  broadcast 192.168.175.255
        inet6 fe80::20c:29ff:fe45:a8b7  prefixlen 64  scopeid 0x20<link>
        ether 00:0c:29:45:a8:b7  txqueuelen 1000  (Ethernet)
        RX packets 247744  bytes 344644771 (344.6 MB)
        RX errors 0  dropped 0  overruns 0  frame 0
        TX packets 75331  bytes 6070686 (6.0 MB)
        TX errors 0  dropped 0 overruns 0  carrier 0  collisions 0

lo: flags=73<UP,LOOPBACK,RUNNING>  mtu 65536
        inet 127.0.0.1  netmask 255.0.0.0
        inet6 ::1  prefixlen 128  scopeid 0x10<host>
        loop  txqueuelen 1000  (Local Loopback)
        RX packets 993  bytes 76788 (76.7 KB)
        RX errors 0  dropped 0  overruns 0  frame 0
        TX packets 993  bytes 76788 (76.7 KB)
        TX errors 0  dropped 0 overruns 0  carrier 0  collisions 0

ovs-system: flags=4098<BROADCAST,MULTICAST>  mtu 1500
        ether 62:da:79:d8:d4:d3  txqueuelen 1000  (Ethernet)
        RX packets 0  bytes 0 (0.0 B)
        RX errors 0  dropped 0  overruns 0  frame 0
        TX packets 0  bytes 0 (0.0 B)
        TX errors 0  dropped 0 overruns 0  carrier 0  collisions 0
2
3
4
5
6
7
8
9
10
11
12
13
14
15
16
17
18
19
20
21
22
23
24
25
26
27
28
29
30
31
32

第二台机器创建好的设备。
root@ubuntu:~/mininet/util# ifconfig -a
br-tun    Link encap:Ethernet  HWaddr 1e:66:43:f2:04:43
          BROADCAST MULTICAST  MTU:1500  Metric:1
          RX packets:0 errors:0 dropped:0 overruns:0 frame:0
          TX packets:0 errors:0 dropped:0 overruns:0 carrier:0
          collisions:0 txqueuelen:1000
          RX bytes:0 (0.0 B)  TX bytes:0 (0.0 B)

ens33     Link encap:Ethernet  HWaddr 00:0c:29:a6:71:34
          inet addr:192.168.175.128  Bcast:192.168.175.255  Mask:255.255.255.0
          inet6 addr: fe80::b933:b350:fe27:b89a/64 Scope:Link
          UP BROADCAST RUNNING MULTICAST  MTU:1500  Metric:1
          RX packets:56569 errors:0 dropped:0 overruns:0 frame:0
          TX packets:15061 errors:0 dropped:0 overruns:0 carrier:0
          collisions:0 txqueuelen:1000
          RX bytes:76151455 (76.1 MB)  TX bytes:1479464 (1.4 MB)

lo        Link encap:Local Loopback
          inet addr:127.0.0.1  Mask:255.0.0.0
          inet6 addr: ::1/128 Scope:Host
          UP LOOPBACK RUNNING  MTU:65536  Metric:1
          RX packets:404 errors:0 dropped:0 overruns:0 frame:0
          TX packets:404 errors:0 dropped:0 overruns:0 carrier:0
          collisions:0 txqueuelen:1000
          RX bytes:33728 (33.7 KB)  TX bytes:33728 (33.7 KB)

ovs-system Link encap:Ethernet  HWaddr 8e:fb:8e:a0:0c:e5
          BROADCAST MULTICAST  MTU:1500  Metric:1
          RX packets:0 errors:0 dropped:0 overruns:0 frame:0
          TX packets:0 errors:0 dropped:0 overruns:0 carrier:0
          collisions:0 txqueuelen:1000
          RX bytes:0 (0.0 B)  TX bytes:0 (0.0 B)
2
3
4
5
6
7
8
9
10
11
12
13
14
15
16
17
18
19
20
21
22
23
24
25
26
27
28
29
30
31
32
*2*|*4* 转移 ens33 网卡的 ip 地址到 br-tun 上
将网卡上的 ip 地址转交给 br-tun。从上一步可以看出 br-tun 和网卡其实是非常类似的,将其赋值 ip 地址就可以当做网卡使用。现在要做的是把虚拟机网卡的 ip 地址给 br-tun。 增加路由信息。将 ip 地址转交给 br-tun 之后,路由信息也需要更新。ip 地址和路由信息都要以实际的信息,在复制实验时不可直接使用我的。这也是为什么在前面记录 ip 信息和路由信息的原因。
ifconfig ens33 0 up
ifconfig br-tun 192.168.175.130/24 up
route add default gw 192.168.175.2
2
3

同样在第二台机器上完成同样的操作。
ifconfig ens33 0 up
ifconfig br-tun 192.168.175.128/24 up
route add default gw 192.168.175.2
2
3

*2*|*5* 将网卡 ens33 作为端口添加到 br-tun
因为 ens33 是流量出虚拟机的接口,所以最后流量还是肯定走 ens33 网卡出去。br-tun 只是一个虚拟机的设备,要将 ens33 作为端口加入 br-tun 中
ovs-vsctl add-port br-tun ens33
同样在第二台机器上完成同样的操作。
ovs-vsctl add-port br-tun ens33
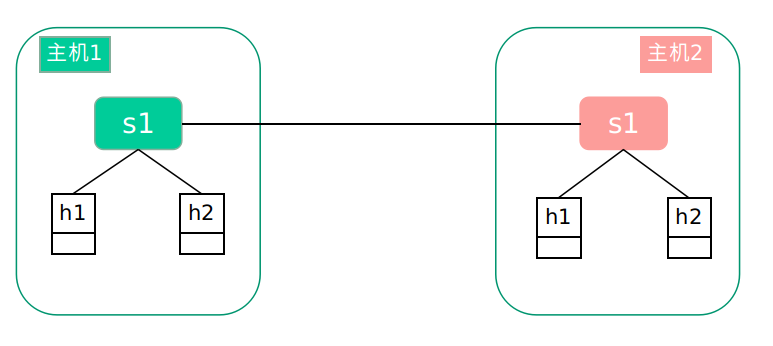
*2*|*6* 启动 mininet
使用命令mn启动一个最小拓扑的实验。创建的设备包括两个主机,h1,h2;一个交换机 s1

使用ovs-vsctl show 可以看到环境中新增了一个交换机 s1

同样在第二台机器上完成同样的操作。
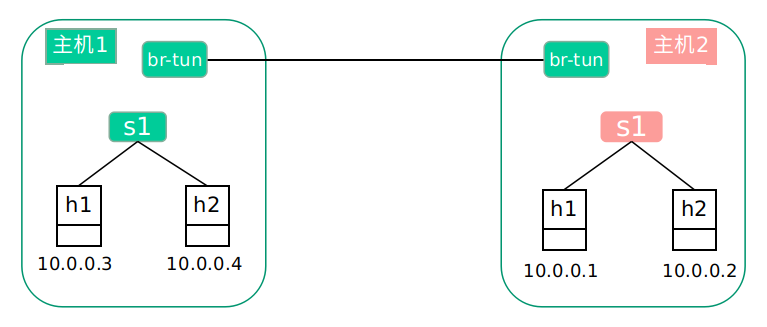
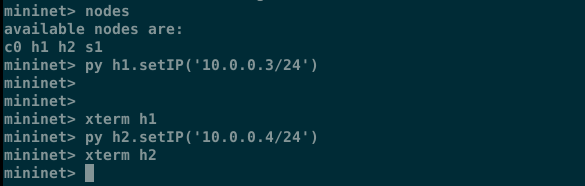
*2*|*7* 修改主机 IP 地址
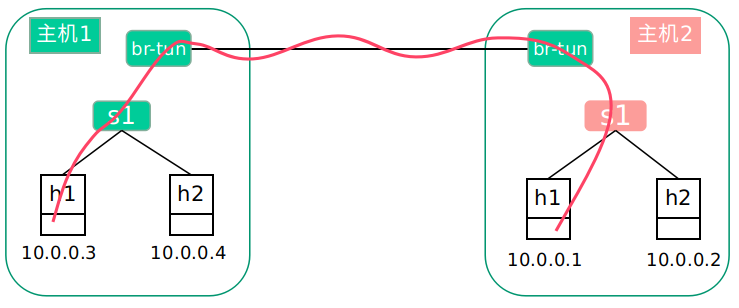
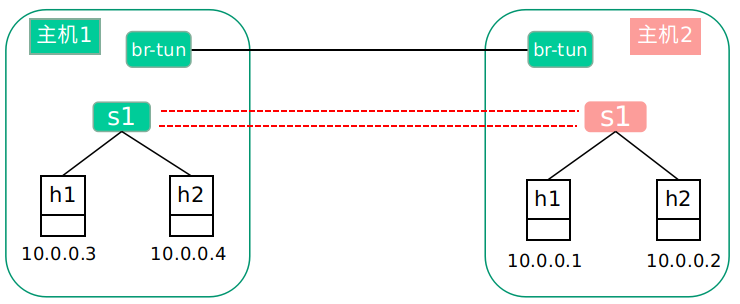
上一步创建的 mininet 中两个主机的默认地址都是10.0.0.1和10.0.0.2, 需要将第一台虚拟机中的 mininet 的主机的地址修改10.0.0.3和10.0.0.4。构建的环境如下:
*2*|*8* 创建 vxlan 隧道
在交换机 s1 创建 vxlan 隧道。这一步是最关键的一步。
ovs-vsctl add-port s1 vx1 -- set interface vx1 type=vxlan options:remote_ip=192.168.175.128
其中s1是创建隧道的网桥,remote_ip就是隧道另外一端机器的 ip 地址。

查看创建好的隧道
 (opens new window)
在第二台虚拟机上做同样的操作
ovs-vsctl add-port s1 vx1 -- set interface vx1 type=vxlan options:remote_ip=192.168.175.130

查看创建好的隧道
 (opens new window)
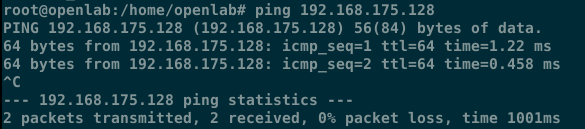
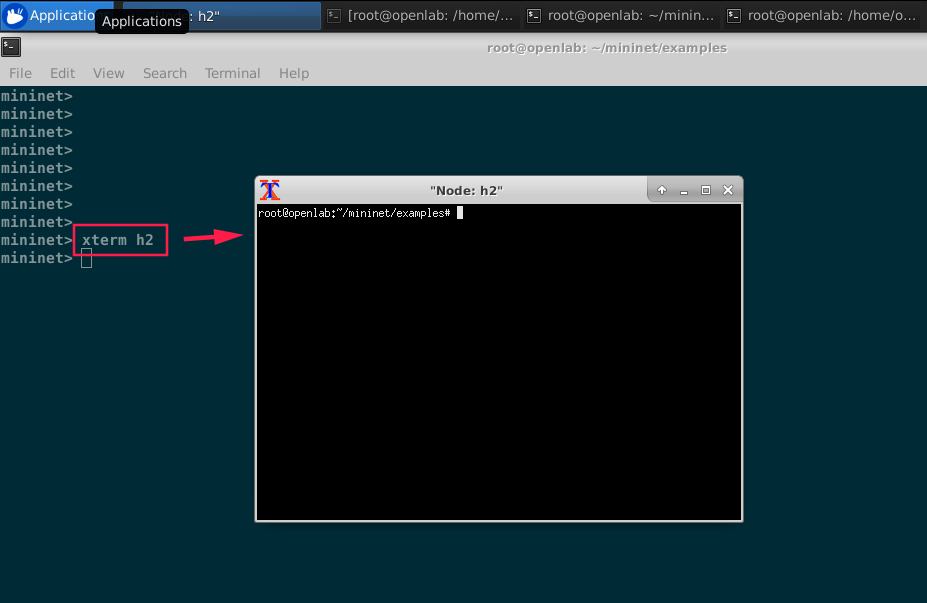
*2*|*9* 验证通信
在第一台虚拟机上打开 h2。使用命令xterm h2可以打开 mininet 中 h2 的操作终端。
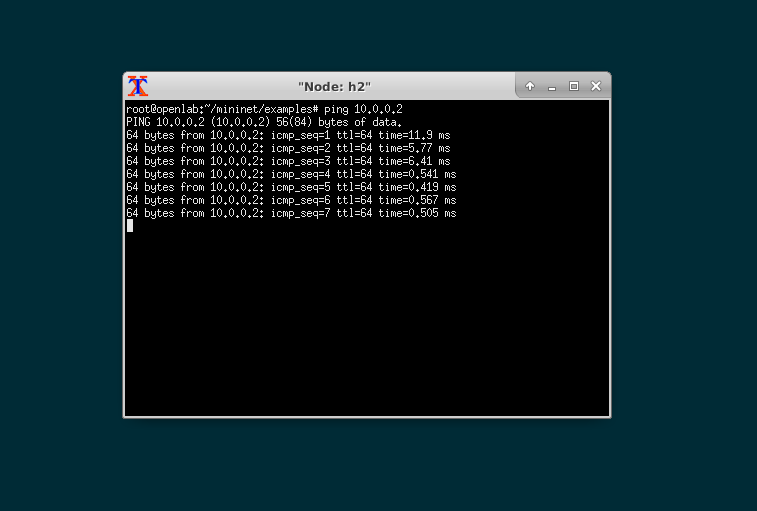
在终端中ping 10.0.0.1

在终端中ping 10.0.0.2
*2*|*10* 抓取 vxlan 数据包
打开wireshark,监听br-tun隧道端点上的流量。可以看到目前流量就是ICMP。

打开具体的 icmp 查看,与普通 icmp 有什么不同之处。正常 icmp 流量是icmp+网络层+数据链路层,而使用 vxlan 的 icmp 则是 icmp + 网络层 + 数据链路层 + vxlan报文头 + udp + 网络层 + 数据链路层。内层是 10.0.0.3 ping 10.0.0.1 的流量,这些流量被 vxlan 封装之后有外层包 192.168.175.130 到 192.168.175.128 的 UDP 数据包。
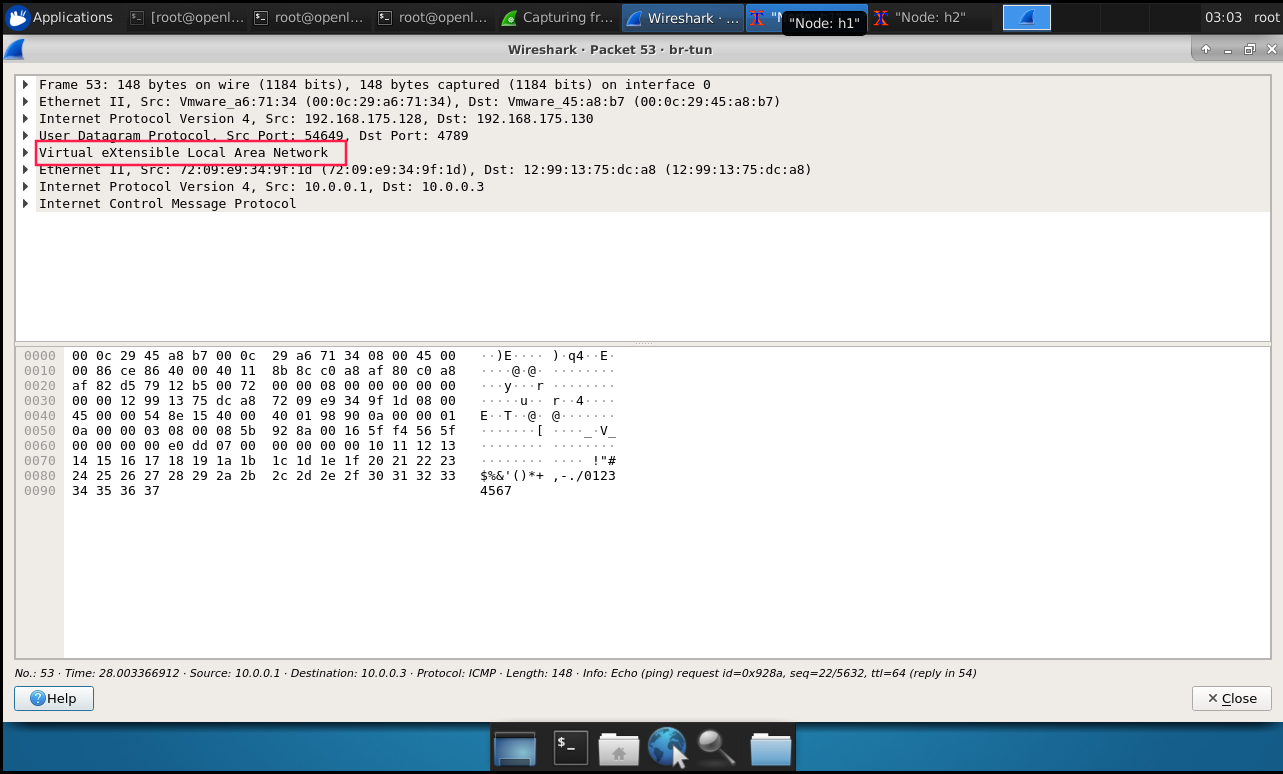
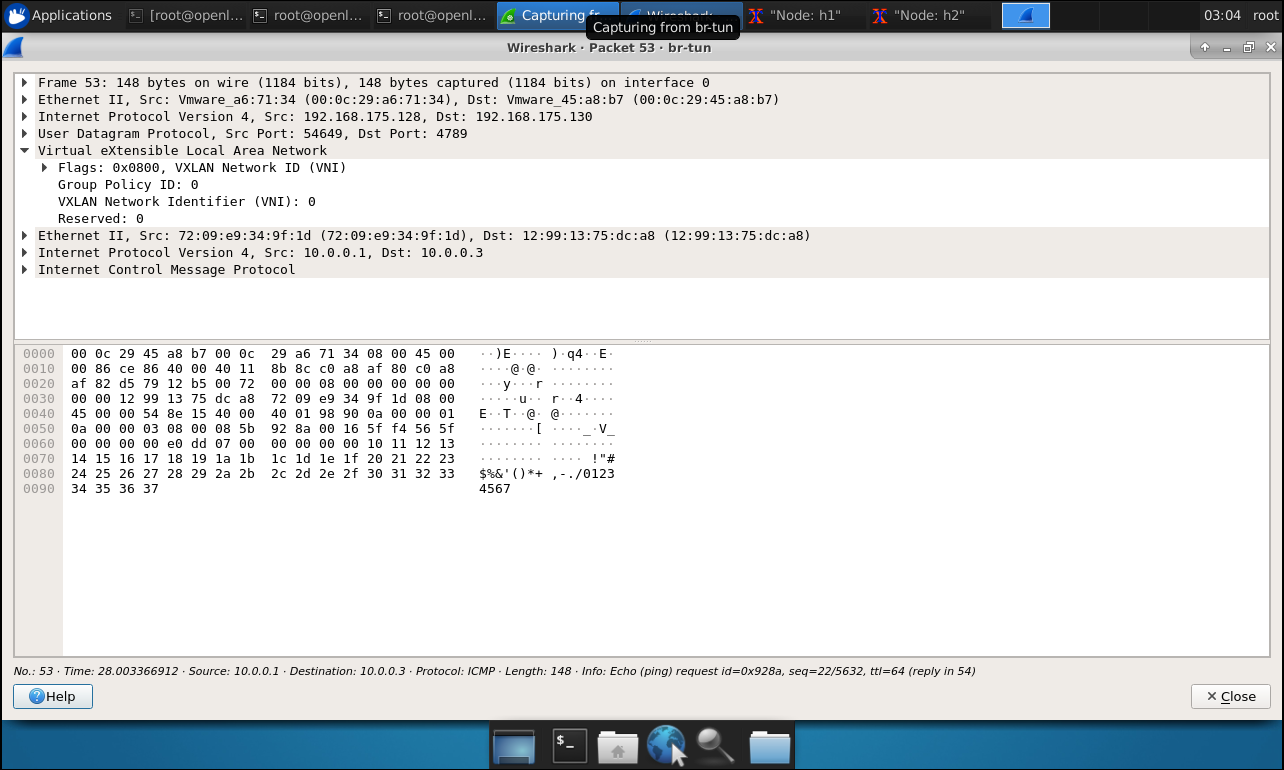
最后看一下 vxlan 报文头的具体信息。里面包含了一个 vxlan network identity 即 vni,就是类似与 vlan tag 的 ID 号。不同的 ID 号之间不可以通信。
*3*|*0* 总结
在两个交换机上配置了 vxlan 之后,就像是在 s1 和 s1 之间打通了隧道,跨越局域网的限制传输数据。逻辑上是如上,实际是流量是从 h1 -->s1-->br-tun -->ens33 -->ens33 -->br-tun -->s1 -->h1。
EOF

本文作者:goldsunshine (opens new window) 本文链接:https://www.cnblogs.com/goldsunshine/p/13630767.html 关于博主:评论和私信会在第一时间回复。或者直接私信 (opens new window)我。 版权声明:本博客所有文章除特别声明外,均采用 BY-NC-SA (opens new window) 许可协议。转载请注明出处! 声援博主:如果您觉得文章对您有帮助,可以点击文章右下角**【[推荐](javascript:void(0)😉】**一下。您的鼓励是博主的最大动力!
全文完
1|0 安装 mininet (opens new window)1|1 安装 git 工具 (opens new window)1|2 从 github 上拉取 mininet 源码 (opens new window)1|3 安装 mininet (opens new window)1|4 验证安装 (opens new window)2|0 配置 vxlan (opens new window)2|1 第一台机器配置 (opens new window)2|2 第二台机器配置 (opens new window)2|3 创建隧道网桥 br-tun (opens new window)2|4 转移 ens33 网卡的 ip 地址到 br-tun 上 (opens new window)2|5 将网卡 ens33 作为端口添加到 br-tun (opens new window)2|6 启动 mininet (opens new window)2|7 修改主机 IP 地址 (opens new window)2|8 创建 vxlan 隧道 (opens new window)2|9 验证通信 (opens new window)2|10 抓取 vxlan 数据包 (opens new window)3|0 总结 (opens new window)